Variables
Variables are a way to organize and simplify the patch graph of your prototype. At the simplest level, a Variable Broadcaster and Variable Receivers can replace the cables that normally connect one patch’s output to other patches’ inputs. (In previous versions of Origami these patches were named Wireless Broadcasters and Receivers, because they removed the “wires” between patches!)
Variables can be especially useful as your prototype becomes more complex and the patch graph grows in size. Instead of dragging a cable and scrolling around a large graph, you can attach a Variable Broadcaster to the source value, and then insert a Variable Receiver patch anywhere you need to use it.
Here’s a basic example where a variable has been used to clean up the patch graph:

Before: The Scroll Y position is connected to 3 different inputs, with cables overlapping parts of the patch graph.
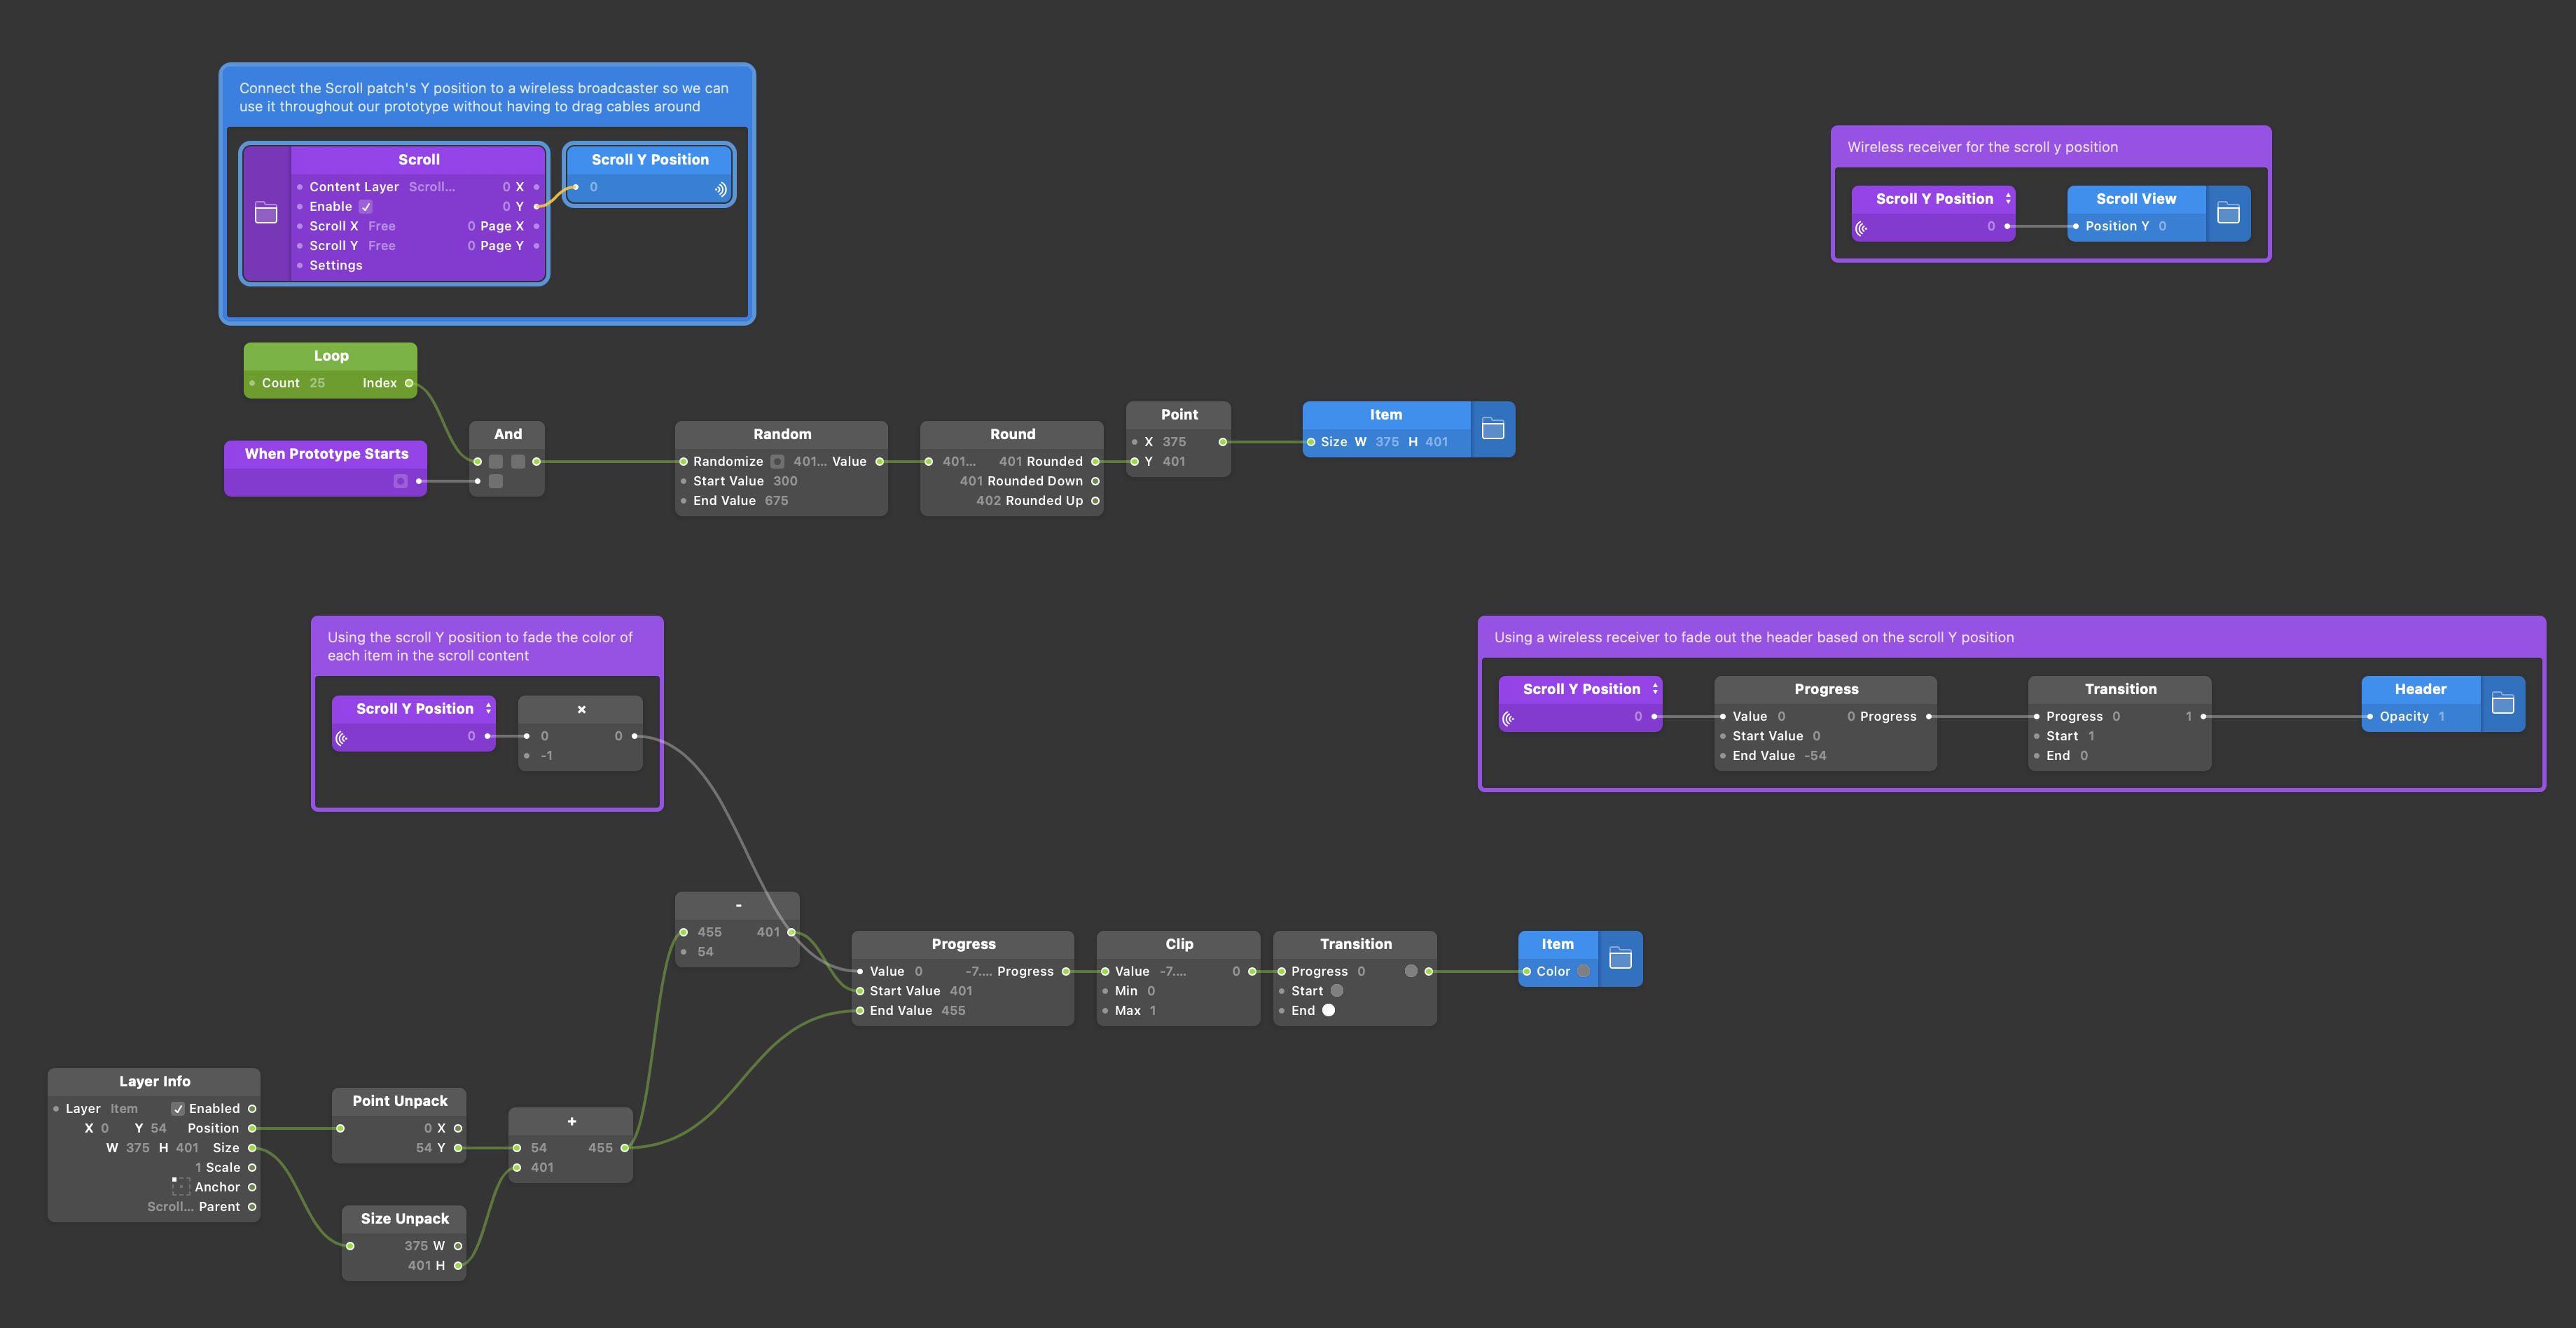
After: A variable broadcaster for Scroll Y position has been connected to the scroll patch, and 3 variable receivers have replaced the cables from the scroll patch
Variables can also help you navigate around a large patch graph. If you click on the ‘radio wave’ icon of a wireless receiver, Origami will pan the patch graph to reveal the source broadcaster. As your prototype grows in size, this can be a helpful way to understand what values are affecting your prototype, and where they’re being modified.
Variables can also be used to centralize values that you use throughout your prototype so that you can change a value in one place and have it update everywhere. For instance, in the example above, there is a toolbar that fades out as the content scrolls beneath it, and the content also fades out as it scrolls offscreen. By setting a variable for the toolbar height, it can be used to transition the opacity of the toolbar as well as the scroll content.
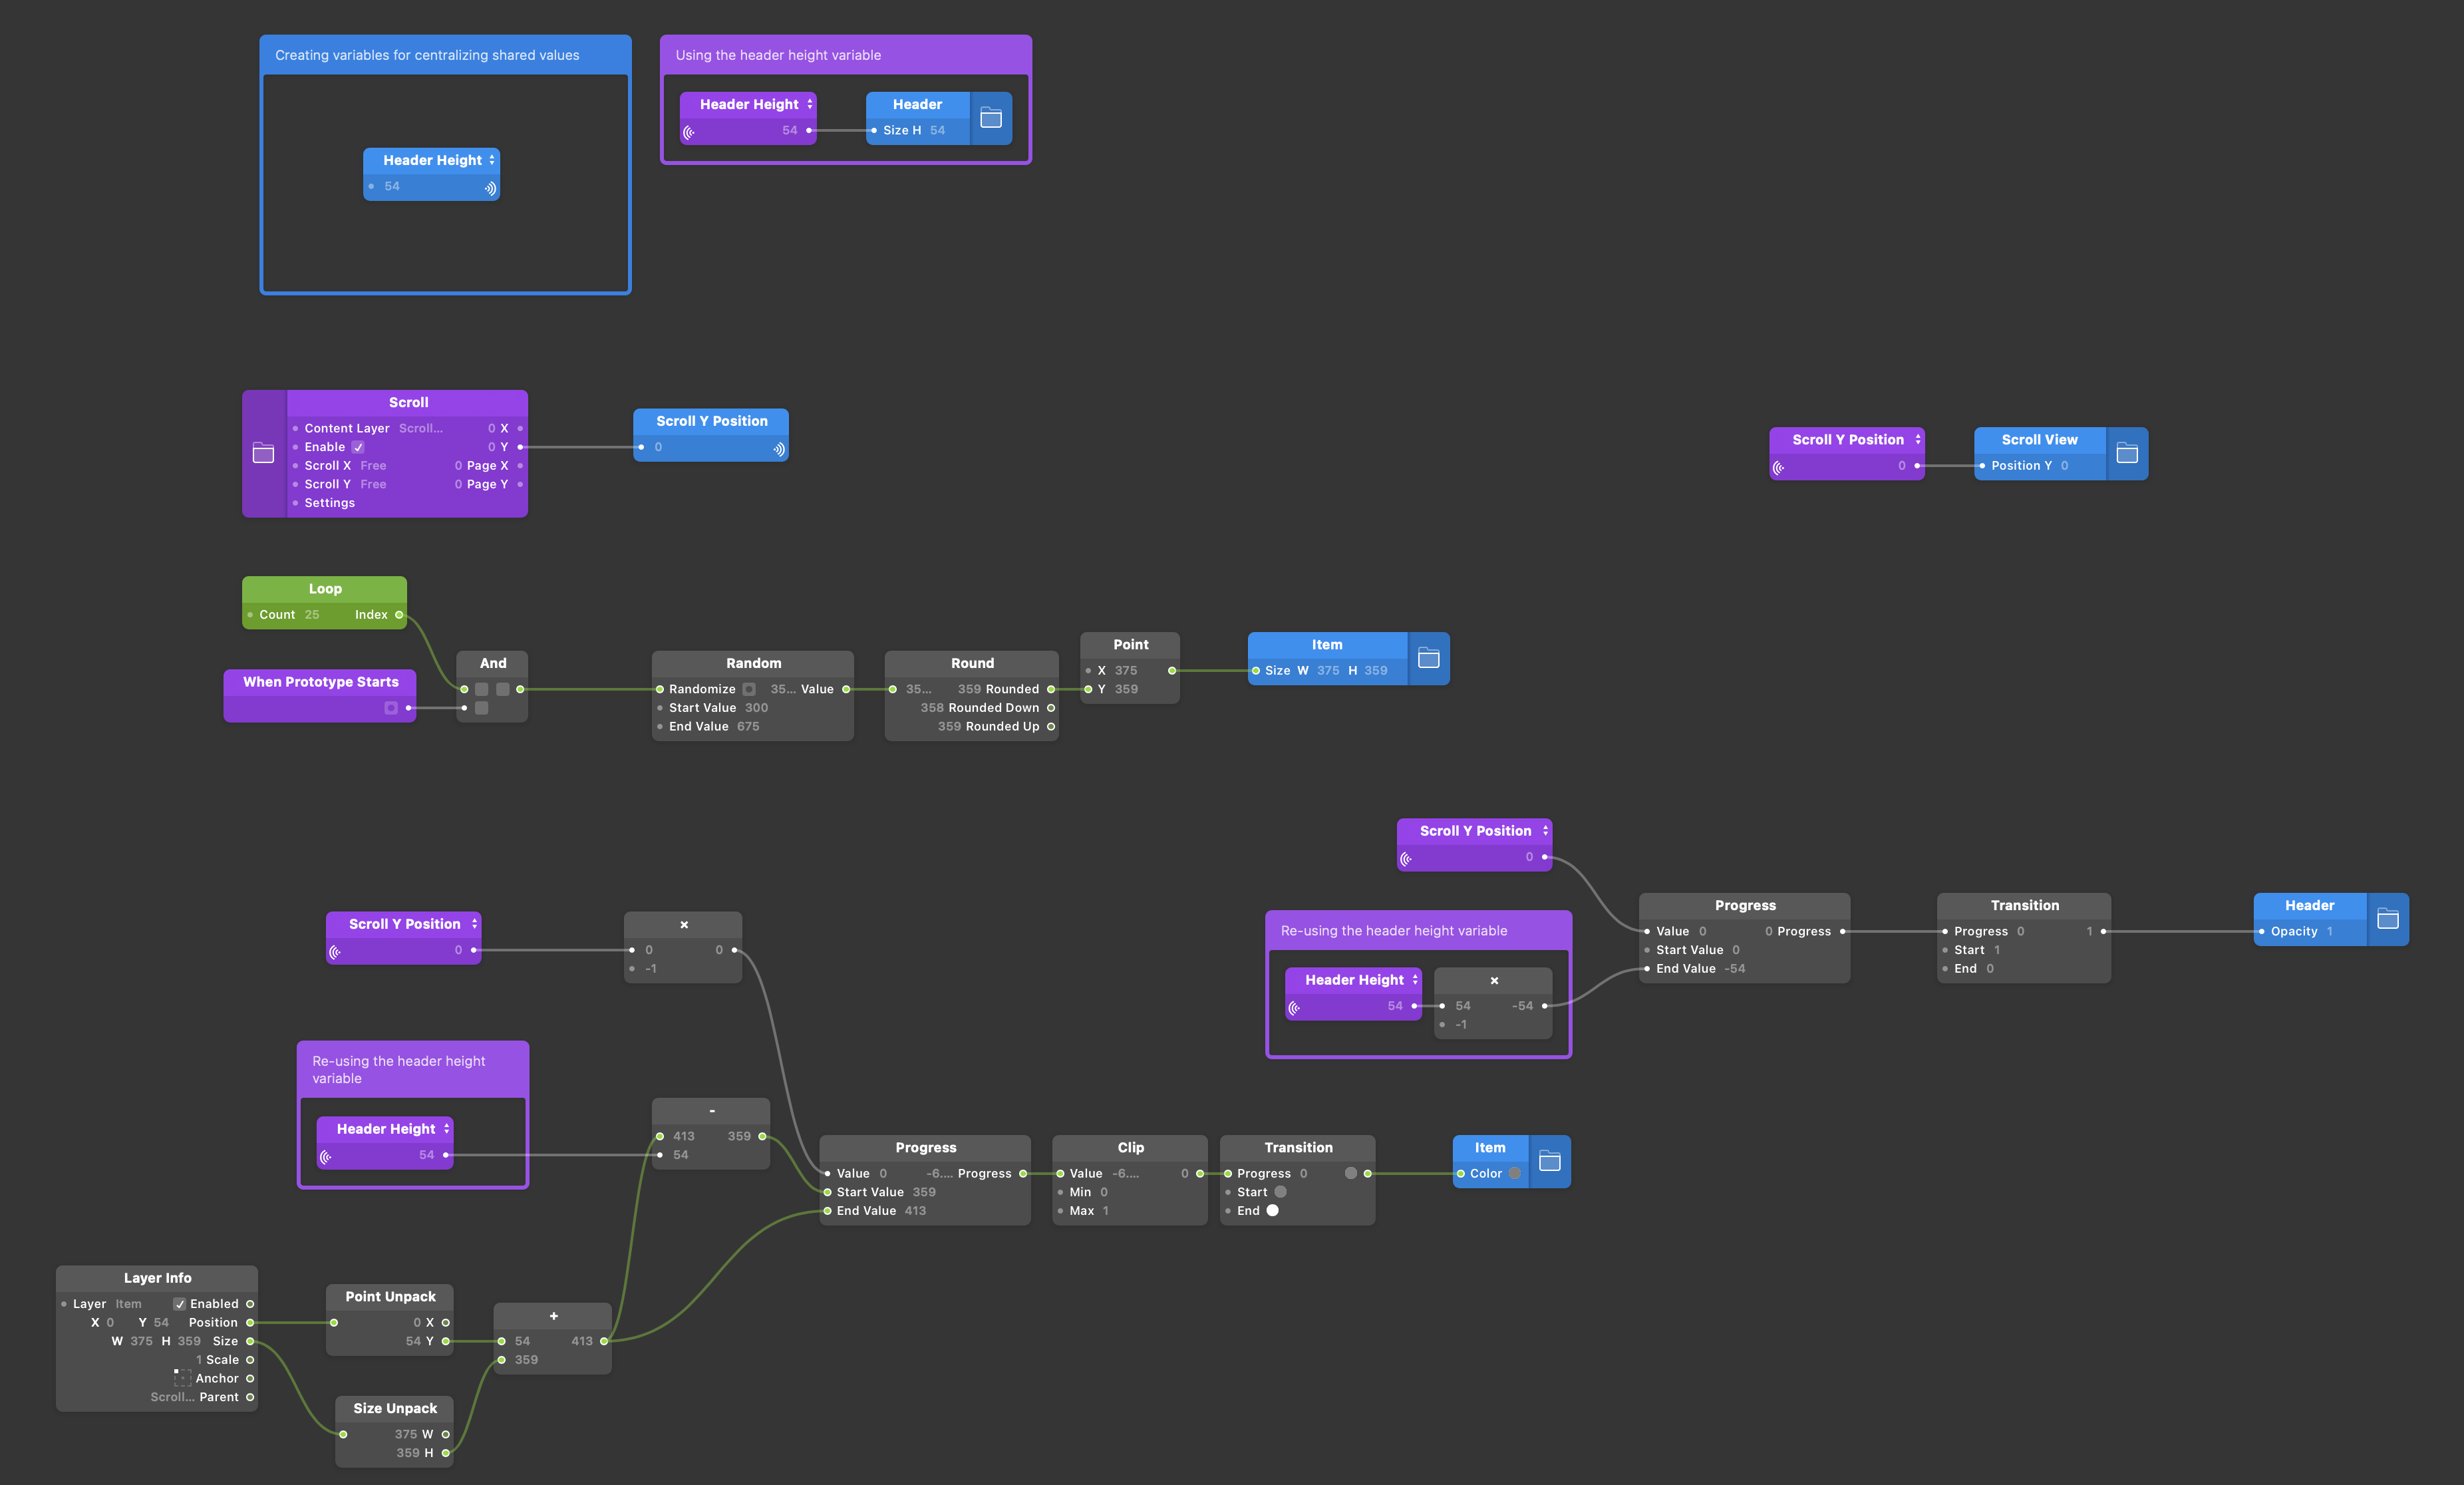
Example: Using variables to centralize & reuse values
Using variables to define and reuse important values not only keeps the patch graph tidy, but also makes it easier to update your prototype. For instance, if the design of the header changes to be taller, you only have to change the value once. (If you’re coming from a programming background, this is similar to defining a constant that you use throughout your code.) This also can help other people who you might share your prototype with quickly understand the important values you’re using throughout a prototype. For instance, you might set up several variables for the UI text in your design, and then share it with a writer on your team to edit and try out different labels, without having to navigate all the logic of the prototype.
As your prototype becomes more complex, you’ll probably want to encapsulate functionality using Components. The components you create can also take advantage of these centralized values with Global Variables.
What Are Global Variables?
Global variables in Origami are used to define values at a high level and propagate those values to wherever they are needed in the prototype. They can be used to change the appearance or functionality of an entire prototype. Global variable values cascade downward throughout components. So, from any location in the prototype, a user is able to read from a global variable that is either in the same component, its parent component, or any ancestor component.
How to Use Global Variables
Perform the following steps to use global variables in Origami:
- Insert a variable broadcaster with your desired name, type, and value into your Origami prototype. This will be where the global variable’s value is defined.
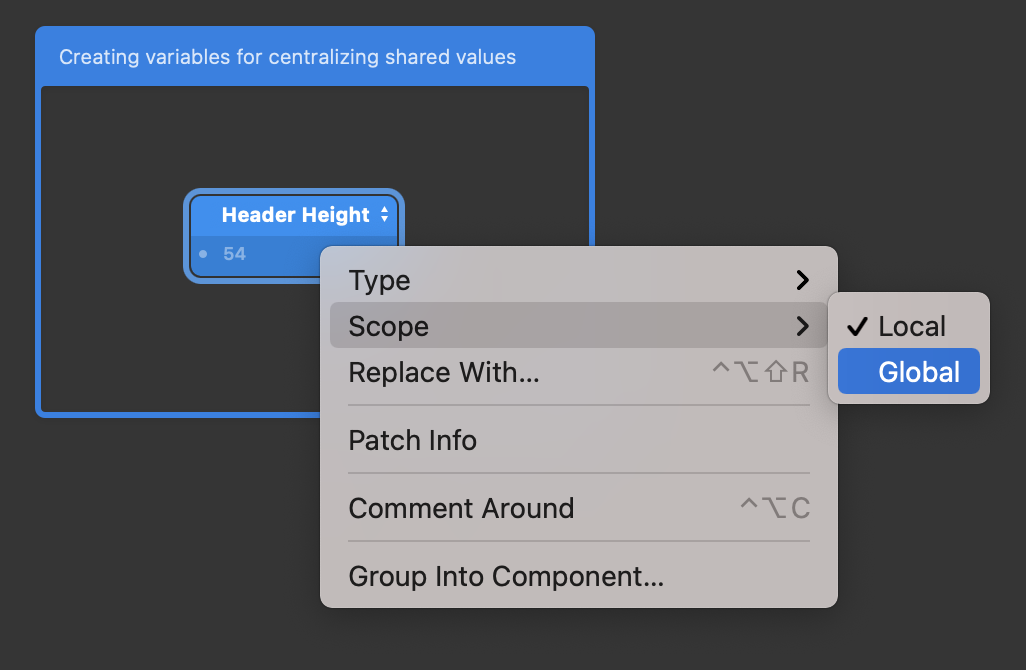
- Click the pop-up menu on upper right corner of the variable broadcaster and choose the option for Global from the scope menu. You can also right click on the variable broadcaster and choose the Scope menu item.
- Insert a variable receiver into any child component of the component in which the variable broadcaster is located. This will be where the global variable value is read.
- Click the name on the variable receiver to see a pop-up menu of all local variables defined in the current component as well as all of the global variables available to the current component.
- To access the value of a global variable broadcaster, choose that global variable name from the menu. The variable receiver will change its scope, name, type, and value to match that of the selected global variable broadcaster.
In the example from above, imagine we’ve made each item in our scrolling view into a self-contained Item View component. If we first change the scope of our Header Height variable at the root of our document to Global, we can now add a variable receiver inside the Item View component that’s connected to the Header Height variable. Now each item view can automatically fade out when its position overlaps the header height.
Global Variables are Cascading
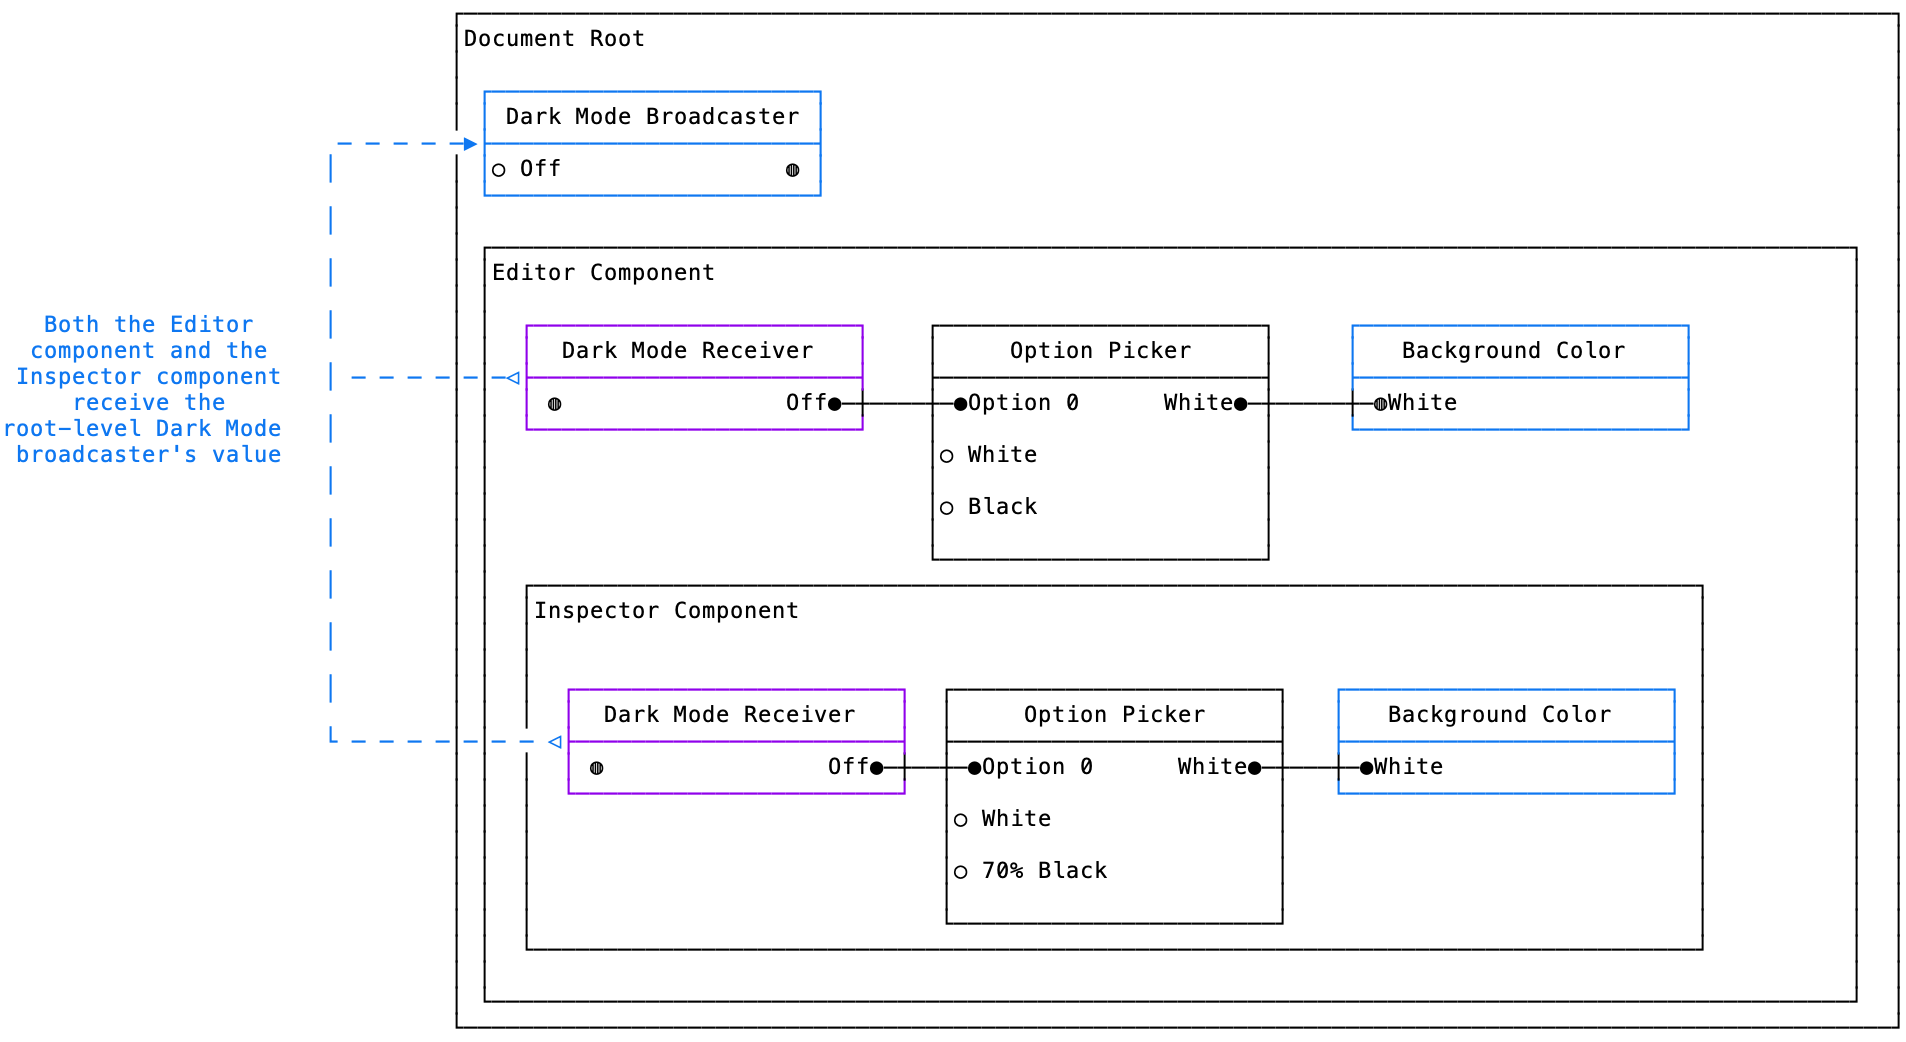
It’s important to note that when you define a global variable, it is accessible from the component it was created in, as well as any components contained within that component. The value cascades from the top level down to each child component that access it, including their children, and their children’s children, and so on. However, components can override an ancestor’s global variable by defining a new global variable with the same name and type of value. This is possible because global variable receivers get their values from the matching global variable broadcaster that’s nearest in the component hierarchy. So, if you want a certain value to apply to specific components in your prototype and then change the value to be different for other child components, you simply add another global variable broadcaster in one of the child components. Let’s take an example of applying a Dark Mode global variable to a prototype. Imagine you have an Editor component, which you’d like to match the system setting for Dark Mode. The background should be white when it’s in light mode, and black when it’s in dark mode. You might also have an inspector panel component in your Editor that should also match the rest of the UI. By setting a global variable for Dark Mode, at the top of your document, the Editor can receive the default value (based on the current system appearance, for example). The Inspector panel will also inherit the Dark Mode value from the root of the document.
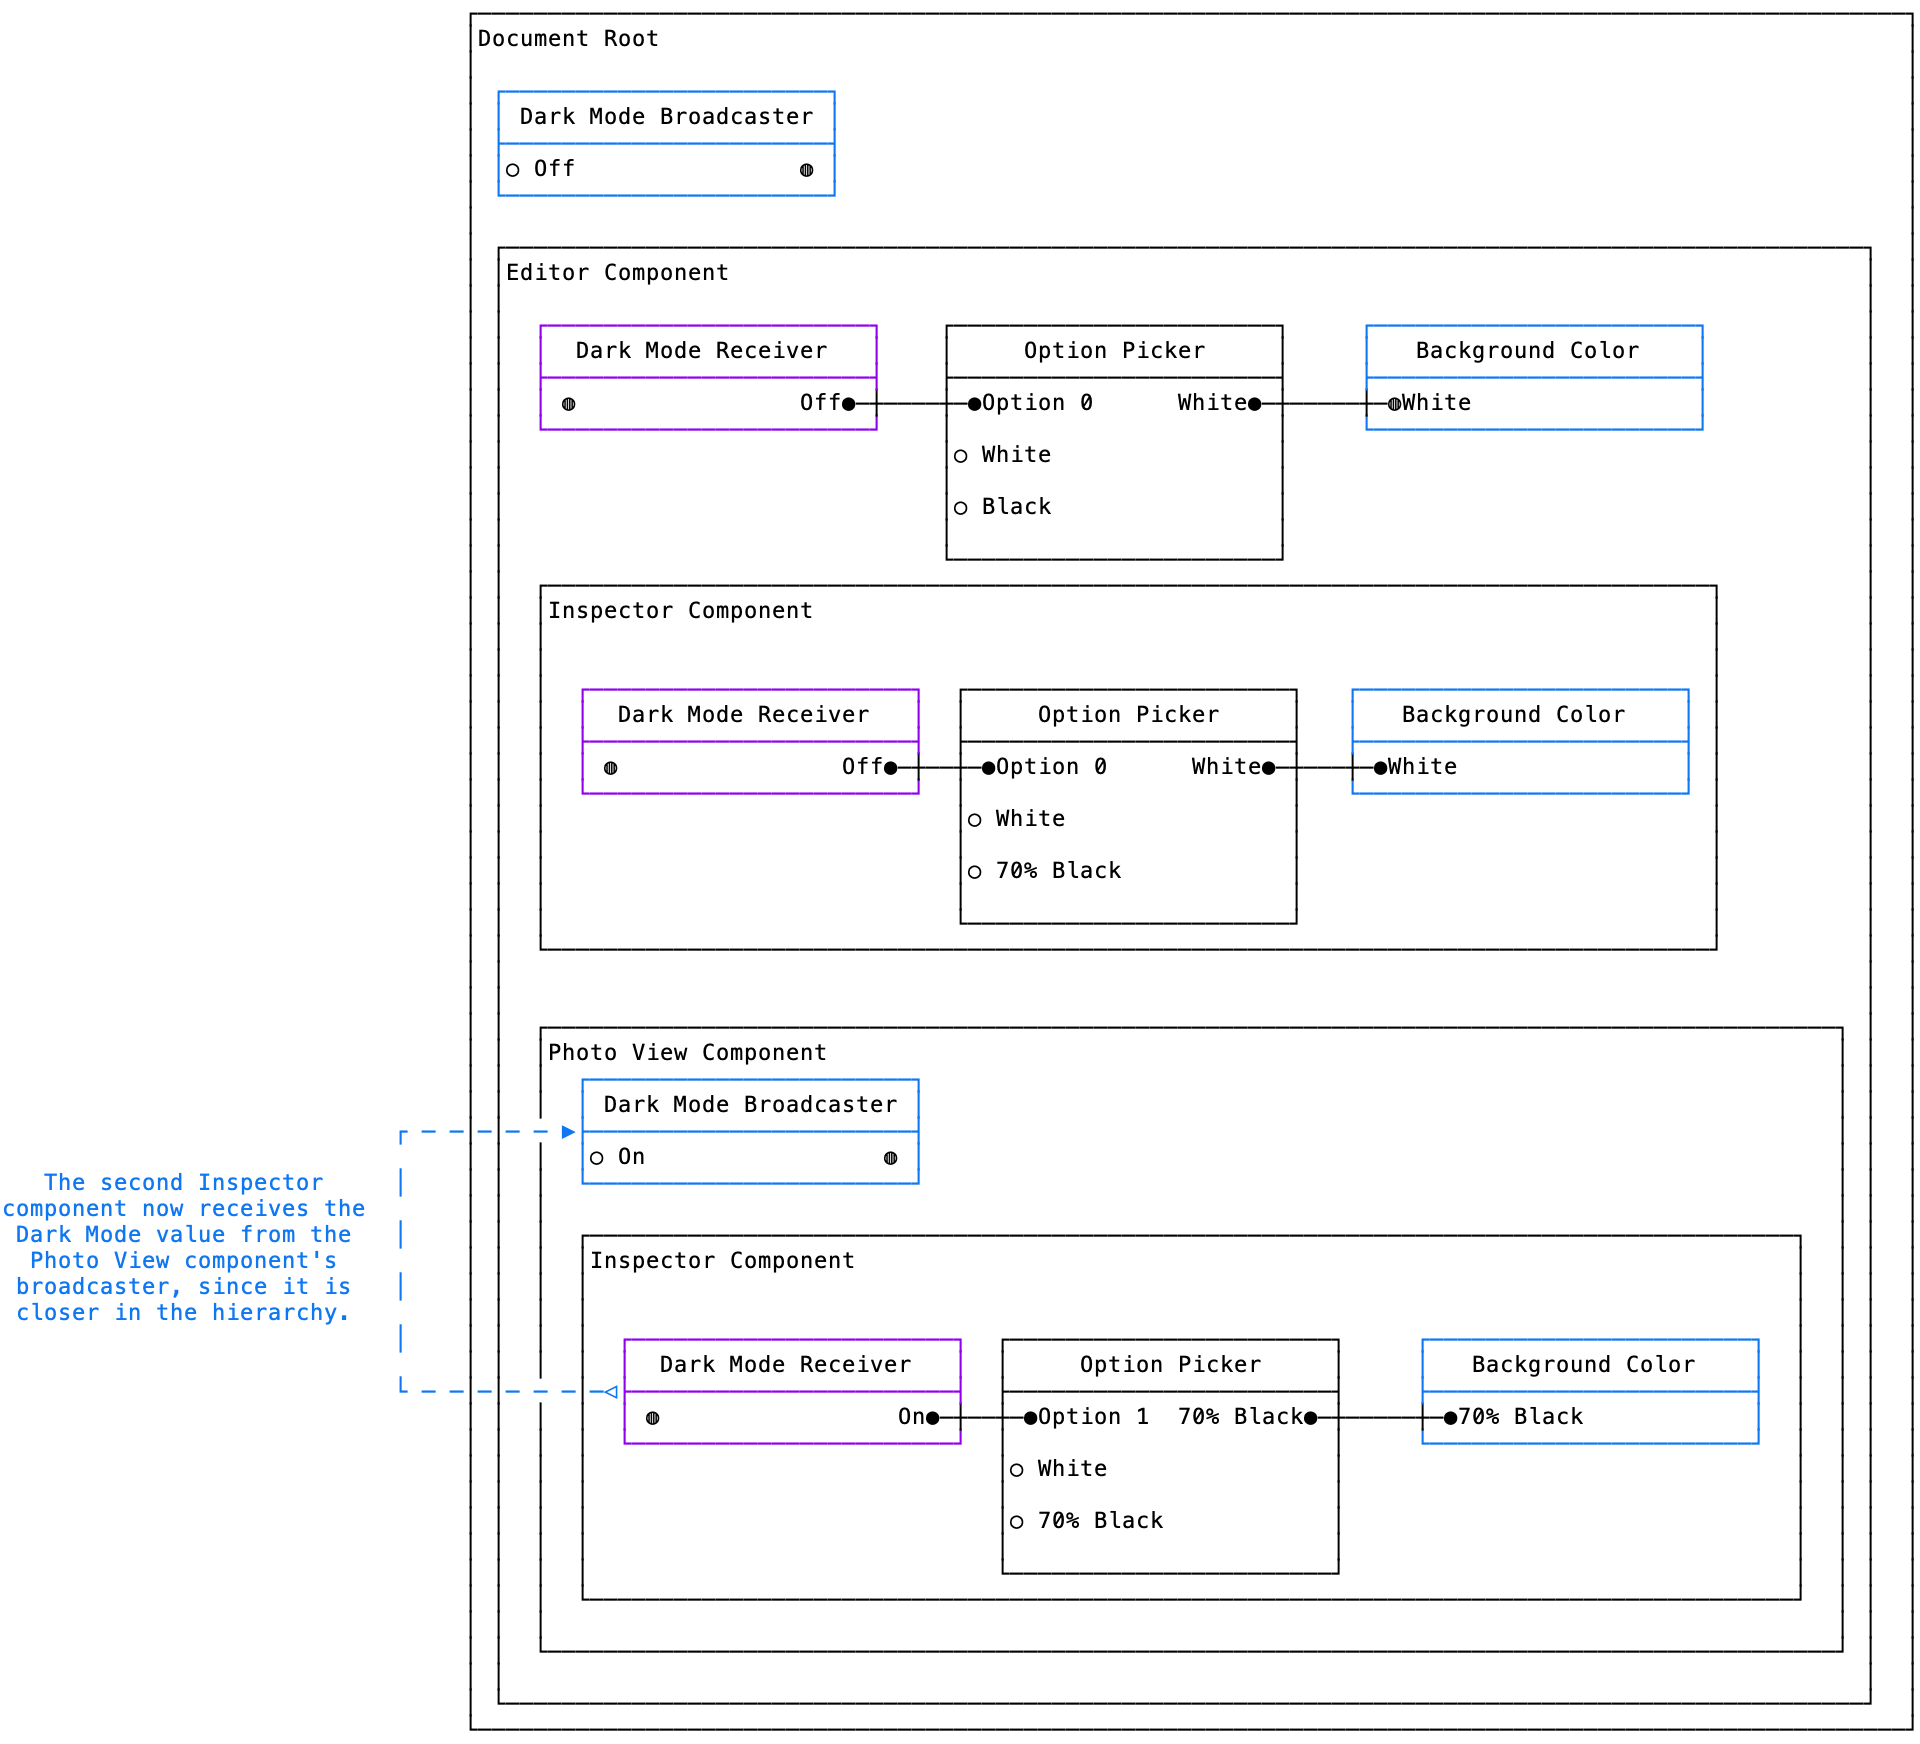
Now imagine your Editor component also has an embedded Photo View component. Instead of matching the system appearance, any UI you display over the Photo View should always have a dark appearance. By creating a new Dark Mode global broadcaster in the Photo View component, we can override the root level Dark Mode broadcaster’s value and ensure that any components placed within the Photo View always honor the dark appearance. Now, the exact same Inspector component we used before will automatically switch to dark mode, since it’s now receiving the Photo View component’s dark mode value.
Conclusion
Variables are a key tool to organize and simplify your Origami prototypes, allowing you to make your patch graph easier to understand, to consolidate logic, and even enable powerful new capabilities for components. You can start small, by just using local variable broadcasters & receivers to make your patch graph more organized. As you advance to building custom components for yourself or others, consider ways global variables can make your components more powerful and easier to use.