Welcome to Origami. We’ll be building a simple prototype, and by doing so learn the fundamentals of using Origami as well as importing from design tools such as Sketch. Follow along by downloading the files that accompany this tutorial.
Copying from Sketch
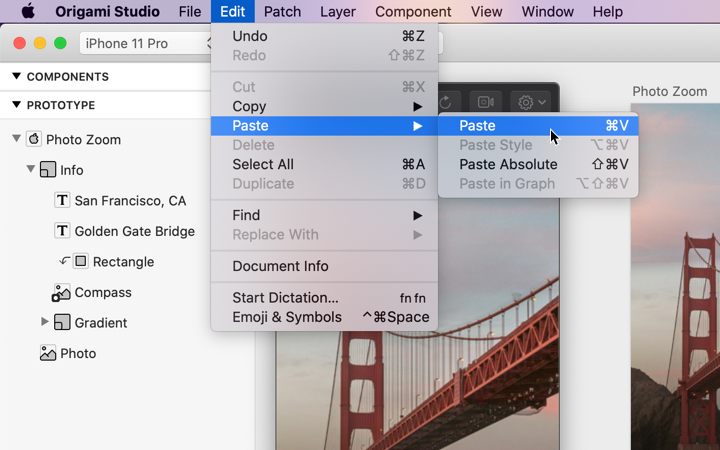
Importing from design tools like Sketch is as simple as copying and pasting. First off, make sure you have the Sketch file from our lessons file open. Next, select the Photo layer (a landscape image of the Golden Gate Bridge) and Info Group (which contains a few text layers, an image, and a gradient). Copy those layers by going to Edit > Copy or using the keyboard shotcut ⌘C. In a new Origami prototype, navigate to Edit > Paste ⌘V.
Copying from Figma
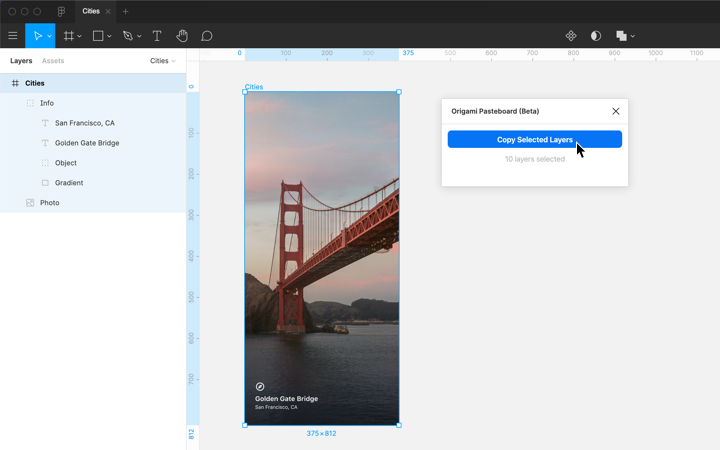
First make sure you have the Origami Pasteboard installed from the Figma plugin community. Import the .fig lesson file by dragging and dropping into Figma then open the file in Figma. Open the Origami Figma plugin from the Plugins menu then select the Photo layer (a landscape image of the Golden Gate Bridge) and Info Group (which contains a few text layers, an image, and a gradient). Click Copy Selected Layers from the Origami plugin. In a new Origami prototype, navigate to Edit > Paste or use the keyboard shortcut ⌘V.
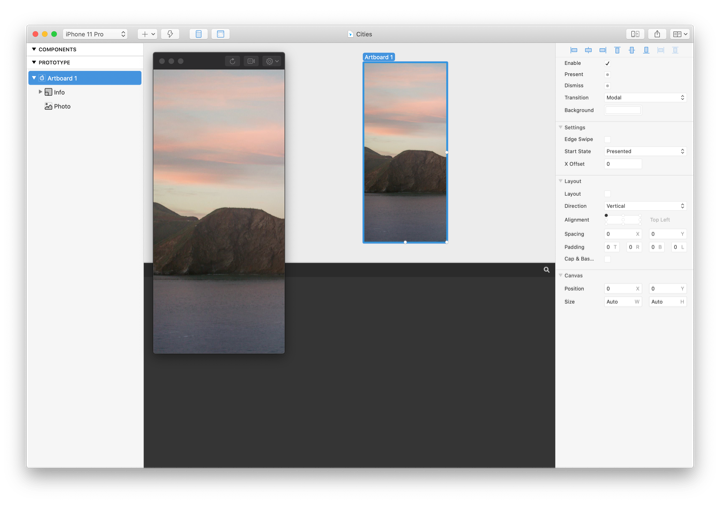
Origami Studio interface
On the left side of the screen is the Layer List, where we see the layers from the Canvas. To the right of that is the Viewer; where we see and interact with our prototype. On the right hand side is the Inspector which lists the properties of the currently-selected layer. The middle area is split between the Canvas on the top and the Patch Editor on the bottom.
Organizing our layers
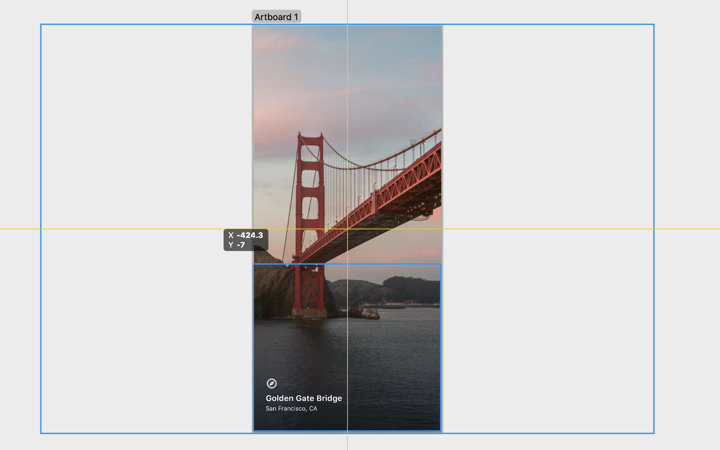
After pasting in from Sketch or Figma, you may have noticed that our layers got misaligned slightly. Let’s fix that by selecting the Photo Layer and Info Group and dragging to the left until those layers are centered.
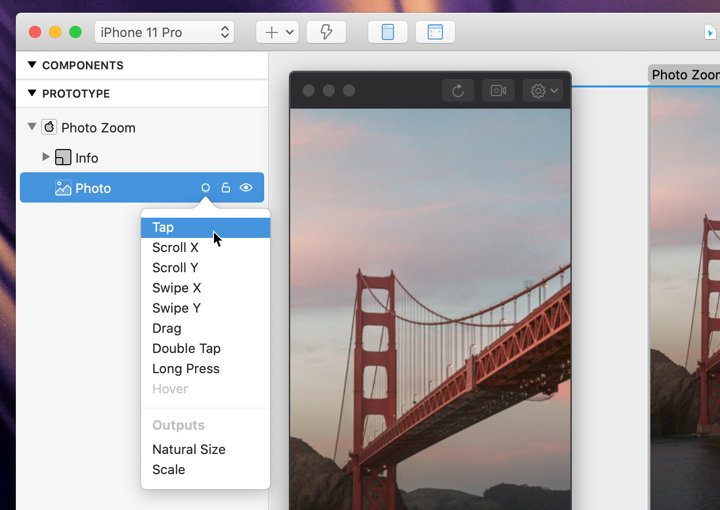
Adding interaction
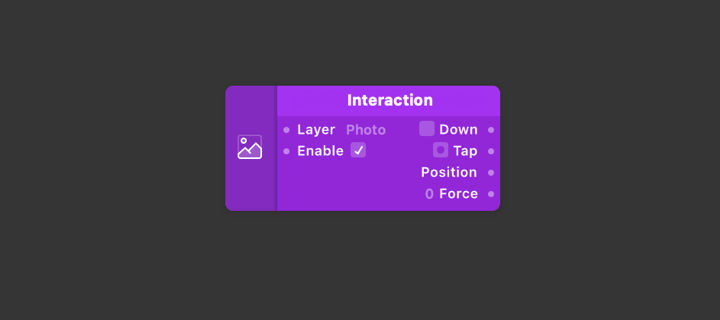
The first thing we want to do is add interaction to the Photo layer. To add interaction to a layer, hover over the layer in the Layers panel, click the circle icon, and then click Tap.
You’ll notice that this adds an Interaction patch to our Patch Editor. We’ll cover patches in detail a little bit later on, but for now, keep an eye on the Down and Tap outputs whilst tapping on Photo in the Viewer. Both of these outputs flash corresponding to when Photo is pressed Down, and when released, which equals a Tap.
Transitioning values
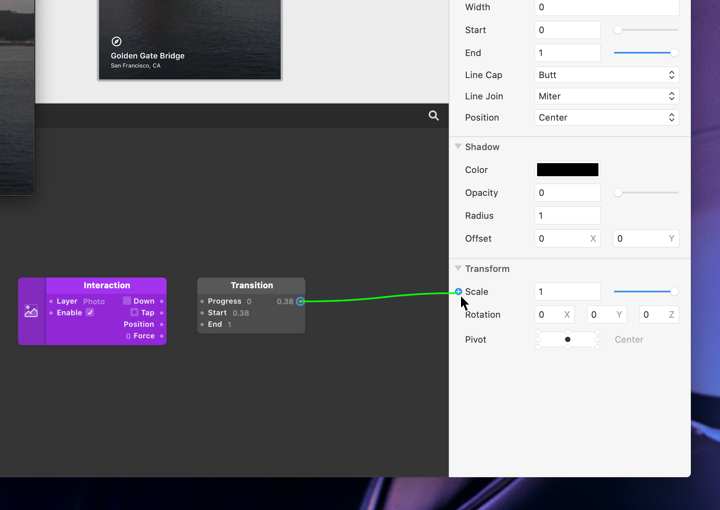
We want this to transition between two values of Scale. A Scale of 1 and a Scale of whatever fits in screen, which is about 0.38. The next patch we want to add is a Transition patch, since we are transitioning between two values. Add this patch by double-clicking on the Patch Editor ⌘⏎, beginning to type ‘transition’, followed by Return ⏎.
Make the Start input on the Transition patch equal 0.38 by typing 0.38 into the Start input field. Change the End input value to 1, since we know that’s the Scale we want Photo to end at.
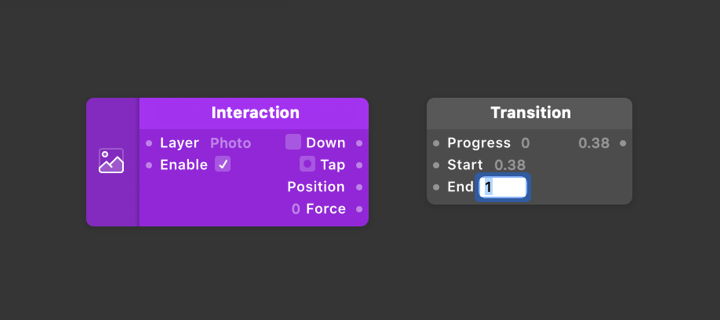
0.38 and End input should be 1.
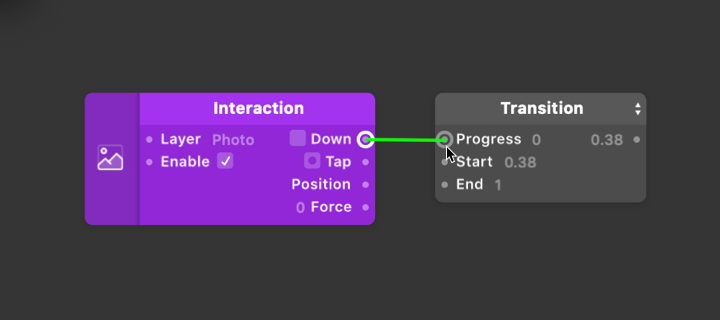
Connecting patches
Connect the Down output of our purple Interaction patch to the Progress input of the Transition patch. Do this by clicking and dragging from the Down output into the Progress input of the Transition patch.
Connecting patches to layer properties
We need to connect the Transition output to the Photo layer’s Scale property. Like we did with connecting Down to Progress, we can make connections from patches to layer properties.
Click and drag on the Transition output and connect it to the Scale property of Photo in the Inspector panel. You should now see that pressing Down on Photo causes the Transition to occur instantly between 0.38 and 1.
Adding animation
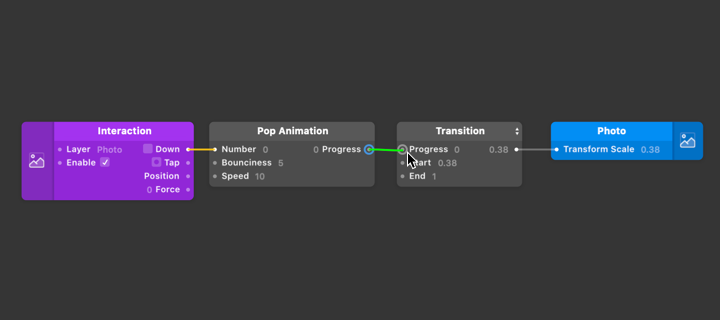
The next thing we want to do is add animation. Double-click on the Patch Editor ⌘⏎ and begin to type ‘animation’. Press Return ⏎ when Pop Animation appears.
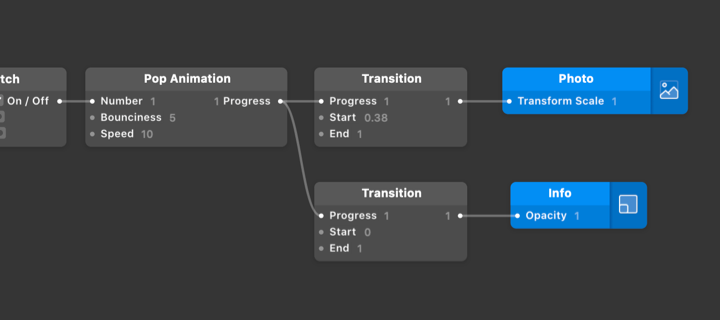
Insert the Pop Animation patch between the two existing patches by connecting the Down output of the Interaction patch to the Number input of the Pop Animation patch, and then the Progress output of the Pop Animation patch to the Progress input of the Transition patch.
Left-to-right flow
You might start to see that everything in the Patch Editor flows from left to right. Now when I tap and hold Down on Photo, this Transition is eased — or animated.
Tap states
We would like this Transition to occur when we tap on Photo, not just when we press Down. Try connecting the Tap output of the Interaction patch to the Number input of the Pop Animation patch.
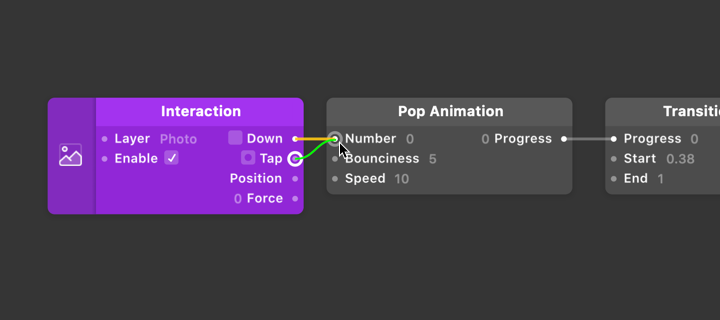
You might see that it is triggering but not holding that state. That is because a Tap only lasts for one frame, and triggers when you release your finger.
Switching states
We need to add a Switch patch to our Patch Editor. Double-click on the Patch Editor ⌘⏎ and begin to type ‘switch’. Press Return ⏎ when Switch appears.
Like we did with the Pop Animation, insert this patch between the Interaction patch and Pop Animation patch. Connect the Tap output of the Interaction patch into the Flip input of our Switch patch. Finally, connect the output of the Switch patch into the Number input of our Pop Animation patch.
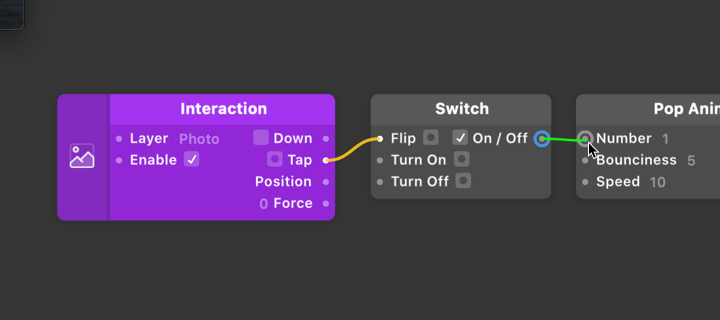
Now a Tap will trigger a Flip on the Switch patch, which is sent onwards to the Pop Animation, and then to the Transition patch. That value will remain until we Flip the Switch back by tapping on Photo.
Multiple transitions
Interaction, Switch, Pop Animation, and Transition make up the bulk of your prototyping in Origami. Mostly because they can be re-used and extended upon for other interactions.
We know that we want our Text layers to hide and show, as well as the background Color Fill to change colors. All of this should be happening within the same physical interaction to our Photo changing in Scale.
Double-click on the Patch Editor ⌘⏎ and begin to type ‘transition’. Press Return ⏎ when Transition appears. Connect the existing output of the Pop Animation patch into the Progress input of this new Transition patch.
Finish by clicking and dragging from the output of the new Transition patch to the Layer Inspector of the Info Group, and connecting to the Opacity property.
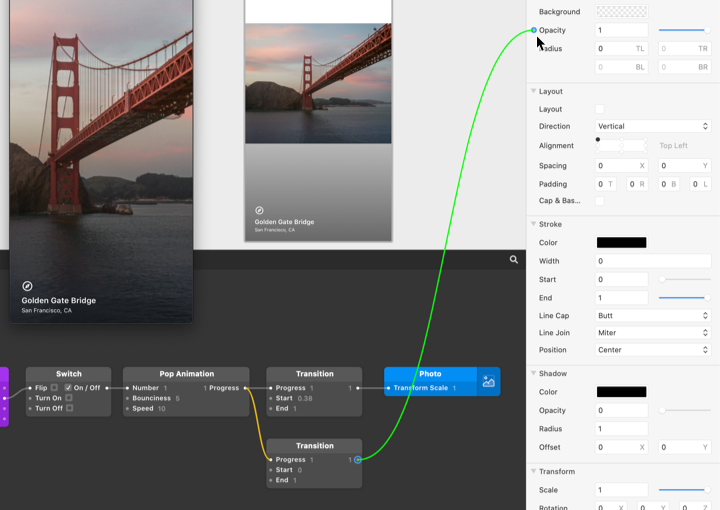
We want our Info to start at an Opacity of 0 and end at on Opacity of 1, so we don’t need to make any changes to the default inputs of this Transition patch.
Changing transition type
Lastly, add one more Transition patch to the Patch Editor. Right-click or Control-click ⌃ this Transition patch and change the Type to Color in the drop-down menu.
We want the starting fill color to be white, and the end to be black. Like before, connect the output of the Pop Animation Progress into the Progress input of the new Transition patch.
Finally, connect the output of our Transition patch to the Color property of the Artboard layer.
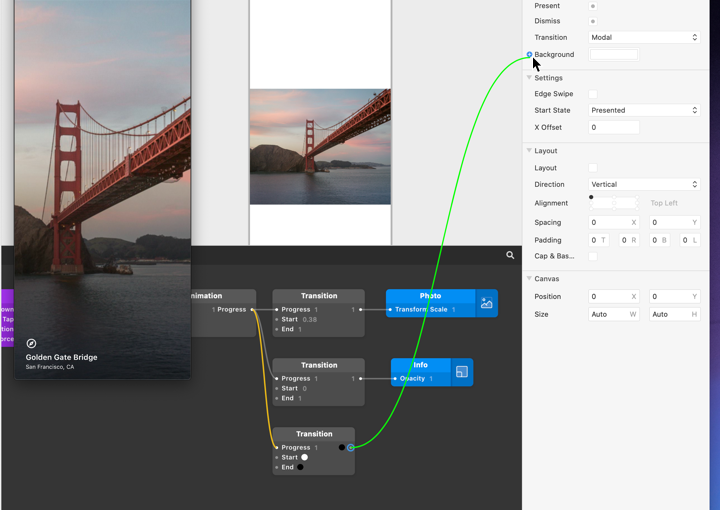
Now when we interact with the prototype, the Color Fill layer transitions from a white fill color when Photo is scaled down (zoomed out), to a black fill color when Photo is scaled up (zoomed in).